Guide to taking Linguaskill remotely
A remote test you take at a place and time of your choosing. You are recorded through your camera, an AI invigilation system reviews that recording, and a trained human reviewer checks it at the end. Individual bookings are for remote testing only.
- How it works
- Alone in a private space · AI and reviewer check
- Minimum age
- 18 or over
- Device
- Windows 11 or macOS 13+ computer
- Results
- 6–8 days after the test
Recent malpractice cases
Recently, some of our Remote candidates did not receive a result for the three reasons below. Everything from the pre-test checks to the end of the test is recorded and fully reviewed afterwards. If anything you do is, or could be interpreted as, malpractice, your result is disqualified and there is no refund.
Skipping or rushing the 360-degree room check
The 360-degree check is recorded and reviewed too. If you skip it or only show part of the room, your result may be disqualified.
How to do the 360-degree checkKeeping a phone on you during the test
Your phone must be switched off and kept outside the test room. Keeping it in a pocket or anywhere else on you counts as having it in the test room. If you do, you will not receive a result or a refund.
Test room rulesAnother person seen during the test
You must be alone in the test room for the whole test. If another person is seen, you will not receive a result. Tell anyone you live with when your test is, and keep the door closed.
Test room rules
Eligibility and test format
Individual registrations run as Remote only.
Age requirement: 18 and over
Candidates aged 16 or 17 can only sit through an institutional group booking, not as individuals.
Testing inside the Republic of Korea
A remote test has to be taken inside the Republic of Korea. You cannot sit it while you are abroad. If that is your situation, contact us before you register.
The four-hour limit
You have four hours from the start time on your registration to finish every module. Starting late does not move the deadline. For refunds on modules you could not finish, see “Refunds and date changes” below.
Invigilation and recording
Your screen and webcam are recorded during the test. After the test an AI service reviews the recordings and a person makes the final check. The records are kept for six months.
Refunds and date changes
If you can't get your equipment or test room ready, cancel or change your date within the deadlines below.
- Cancelling and refunds
- Cancel at least 3 business days before the test for a full refund, or at least 1 business day before for a 50% refund. After that, there is no refund.
- Changing your test date
- You can change your test date once. Ask at least 3 business days before the test. After that, a change is possible only for an unavoidable reason backed by evidence, such as illness or an accident, and still only once.
- When there is no refund
- Under the Cambridge terms there is no refund if your result is disqualified for malpractice, or if you keep a phone or other electronic device in the test room. There is also no refund for modules you could not finish within the four hours because you started late or because of a problem with your own equipment or internet.
- Illness, accidents or system failures
- If illness, injury or another exceptional event stopped you taking the test or affected you on the day, tell us with evidence within 48 hours of the test date and before results are released. The same applies if a Cambridge system failure or a problem on our side stopped you finishing. We will review it and offer a new date or a refund.
Equipment and software
These need to be in place 24 hours before your test.
Eligible devices
You need Windows 11 or macOS 13 (Ventura) or later. Microsoft ended support for Windows 10 in October 2025, so Cambridge does not guarantee that it will work. The secure browser does not run on phones, tablets (iOS or Android), Chromebooks or Linux, so you cannot test on them.
Webcam
640×480 or better; a built-in laptop camera is fine. On a desktop computer you will need an external webcam.
Computer specification and internet
4 GB of memory, 10 GB of free disk space, and an internet connection of 5-10 Mbps both up and down. A wired connection is the most stable.
One monitor only
Only one monitor is allowed. If you use more than one, move the others out of the test room before the test.
Photo ID
Bring the original of the same ID you registered with: a passport, national ID card or driving licence. It must show your name and photo and must not be expired. If your ID has changed since you registered, tell us before test day.
Closing AI tools and translators
Anything that checks spelling, improves your writing or translates counts as malpractice. Close input method editors (IME) and keyboard translation tools too. If the secure browser finds one of these running, the test will not start.
Headset requirements
What you need depends on the modules you are taking.
If you are taking Speaking
You need an over-ear, closed-back headset with a boom microphone. Built-in computer microphones cannot be used.
If you are not taking Speaking
You can use external speakers instead of a headset. You still have Listening, so the test room needs to be free of background noise.
How to connect
USB or a wired connection only. Bluetooth is not supported. Confirm that sound and recording both work in the Technical Check.
Where you take the test
Before the test starts you have to sweep the whole test room with your webcam through 360 degrees. Set the test room up in advance so it meets these conditions.
A test room where you can be alone
It must be a private residence or a private space inside a public building. You cannot test in a shared public place such as a library, café or open-plan office. A booked room (a hotel room, a university library study room) is fine if you can guarantee you will not be disturbed.
Nobody else in the room
You must be alone in the test room for the whole test. If anyone else comes in or is seen on camera, you will not receive a result. Tell anyone you live with when your test is.
Door closed, glass walls covered
Keep the door closed during the test. If the test room has glass walls, close the curtains or blinds.
Quiet and well lit
There should be no distracting background noise such as traffic, and your surroundings must be clearly visible at all times.
Nothing with English writing in view
No posters or other material with English writing may be visible. Close any desk drawers as well.
At a desk or table
Sit or stand at a desk or table. A low table such as a coffee table is not allowed, and you cannot test with the laptop on your lap, on a sofa or lying down.
Not in a vehicle
The test cannot be taken in a vehicle, moving or parked.
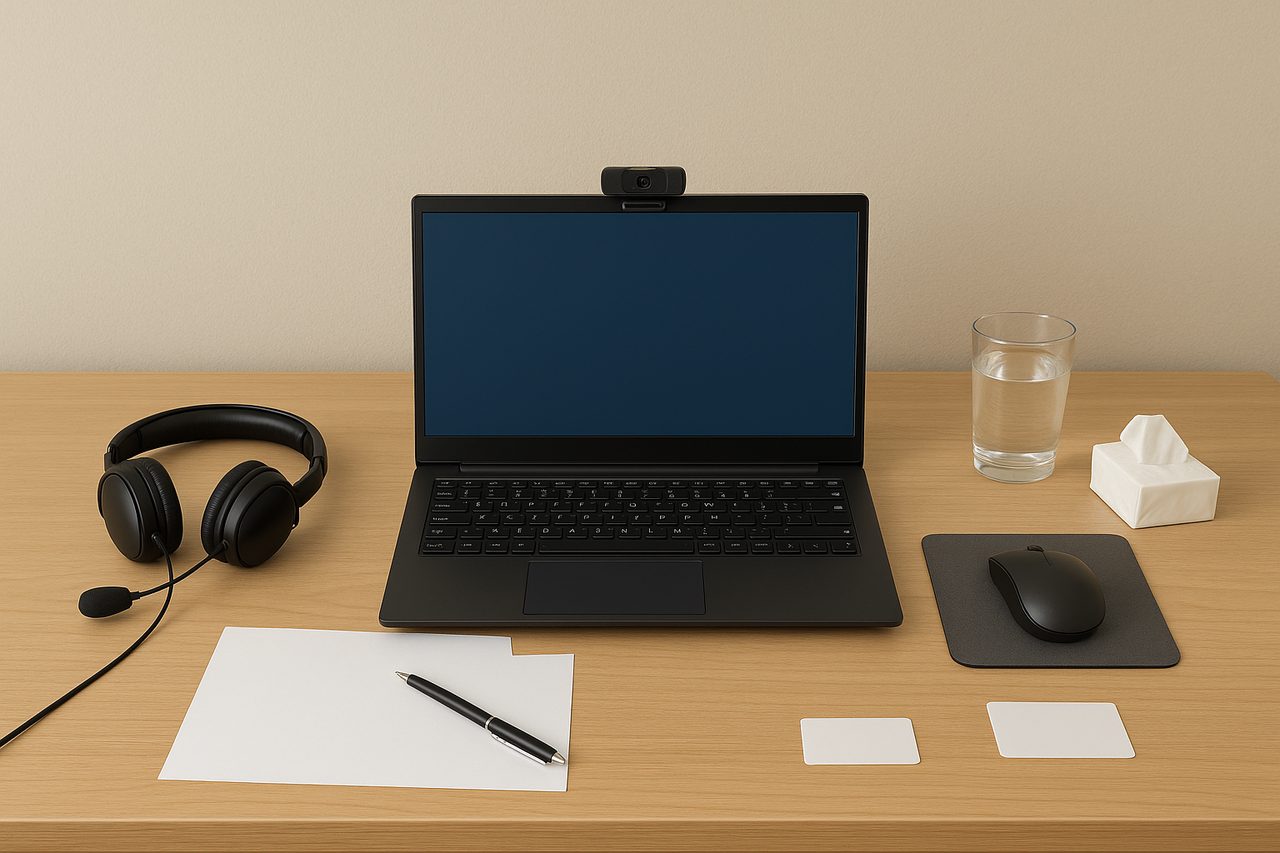
What can be on your desk
The list is fixed. Anything not on it has to be cleared away.
Allowed
- Computer or laptop, a stand if you need one, and the charger
- Keyboard, mouse and mouse mat
- Headset (external speakers are fine if you are not taking Speaking)
- Webcam
- Your login details, written down
- The original photo ID you registered with
- Pen or pencil and blank paper for notes
- A bottle of water with the label removed, or water in a clear glass
- Tissues or a handkerchief
- Medicine and medical devices you told us about and we approved
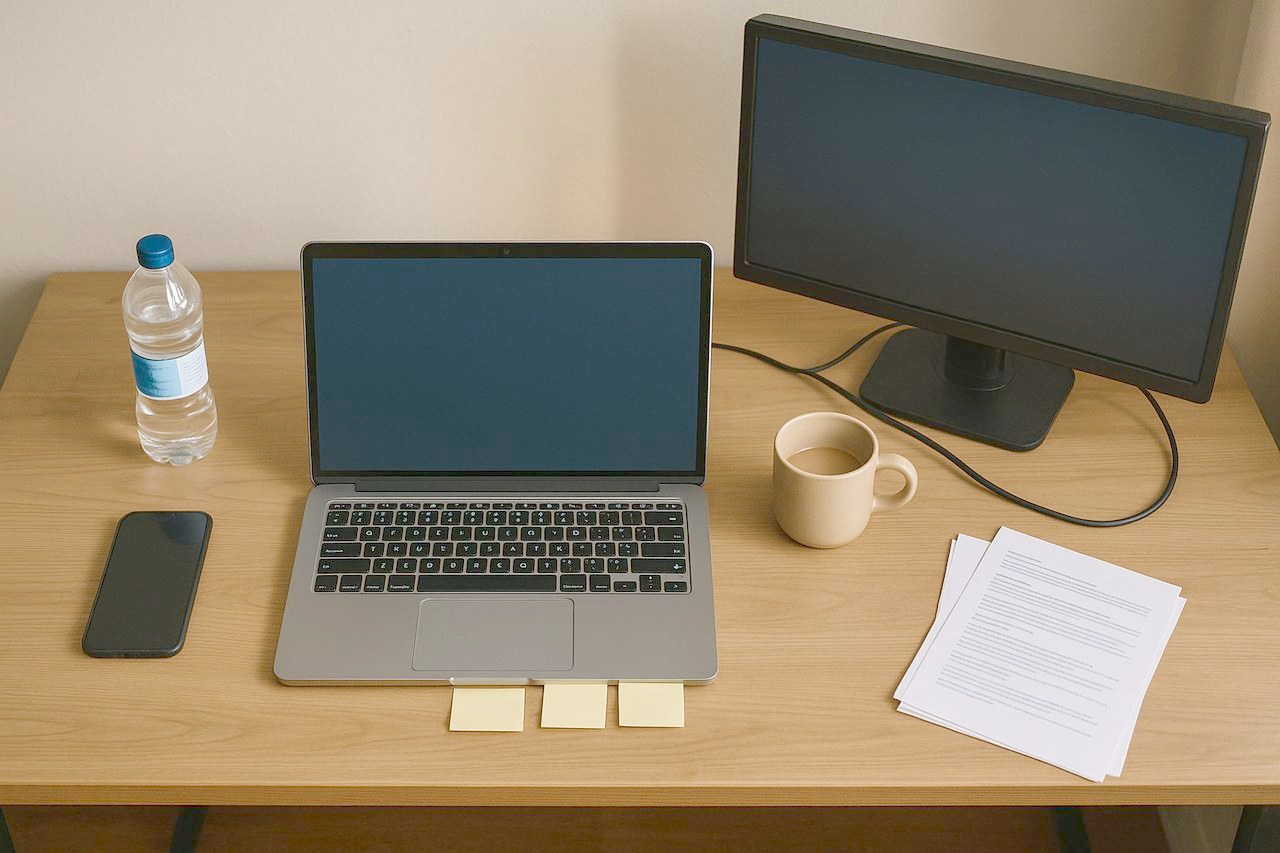
Must be cleared away
- All electronic devices and watches, including phones and smartwatches (switched off and kept outside the test room)
- A second monitor (not allowed in the test room even if it is not plugged in)
- Any printer attached to the computer (switched off and out of reach)
- Notes stuck to the computer or around the screen
- Labelled water bottles, and any food or drink other than water
- Printed material of any kind, including a printout of this page
Your phone must be switched off and kept outside the test room. Keeping it in a pocket or anywhere else on you is not allowed either; if you do, you will not receive a result or a refund. The one exception is calling us about a technical problem during the test: step outside the test room to make that call, and when it is over, switch the phone off and leave it outside again.
Allowed items: an example
Banned items: an example
Getting set up
From installing the secure browser to closing the test, in the order you will actually meet them.
Install the secure browser
Download and install the Talview secure browser, from the Microsoft Store on Windows or as a separate installer on Mac. Uninstall any older version first.
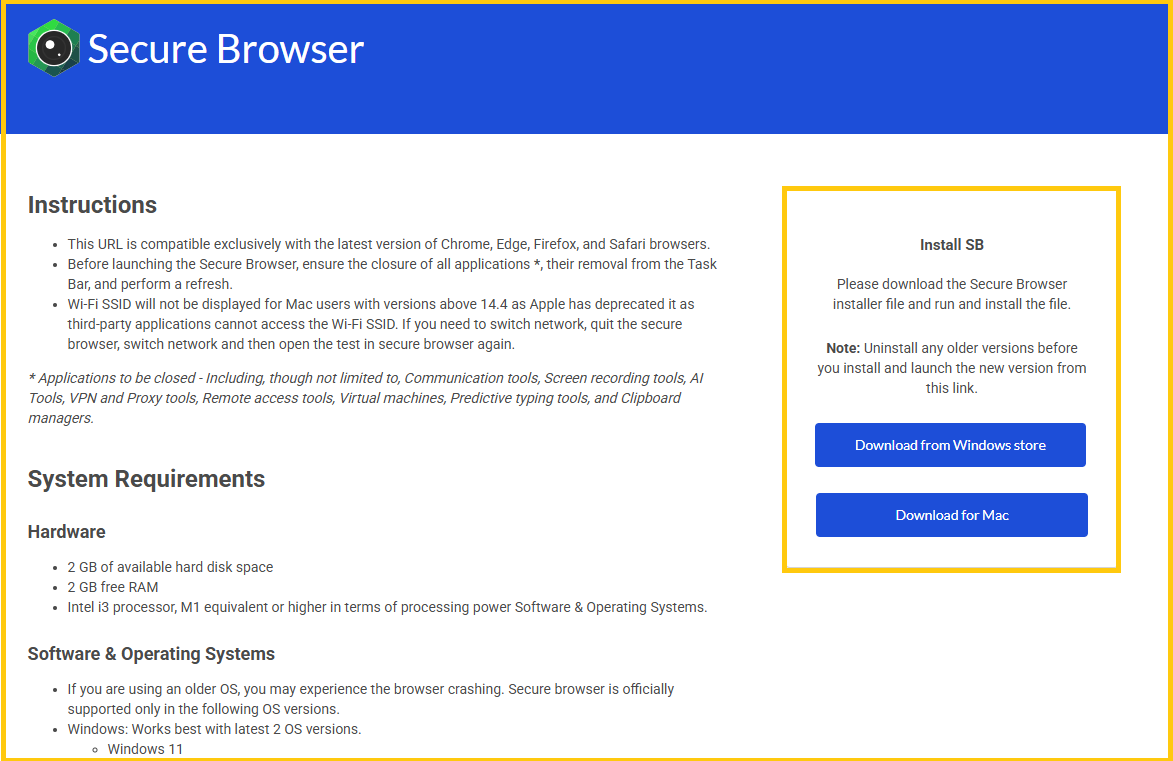
Use the button on the right of the install page that matches your operating system. View full size Run the secure browser diagnostic
Opening the installed browser brings up a diagnostic screen. Press Start and it lists the applications you will need to close on test day.
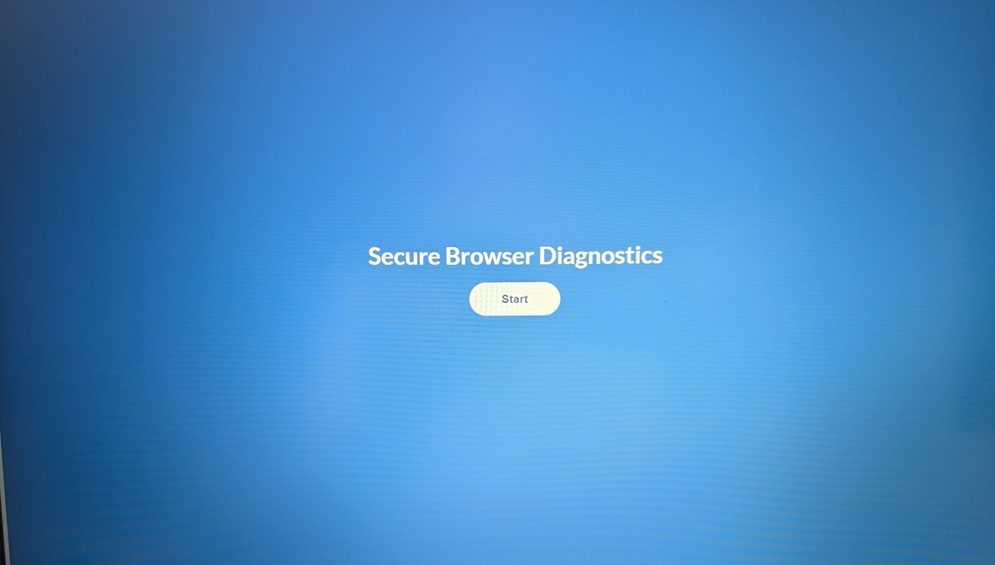
A blue screen with a single Start button is what you should see. The diagnostic is not the test, so you can run it as often as you like. View full size Technical check
Go to Technical Check on the Cambridge English Test Portal (Metrica). No login is needed. It works through your operating system, internet speed, headphones and microphone in turn.
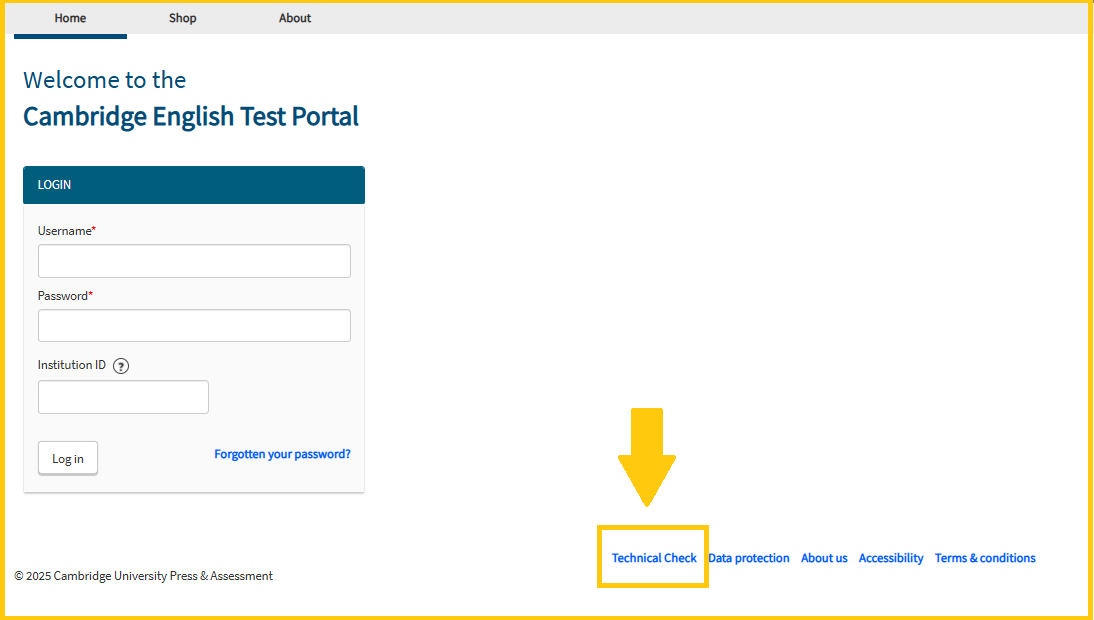
Technical Check sits outside the login box, at the bottom right of the screen. View full size
Install, then check
Cambridge's own booklet puts the secure browser install first. Opening the installed browser also runs a diagnostic that lists the applications you must close on test day. The technical check is four steps (operating system and browser, internet speed, headphone sound, microphone recording) and runs in Chrome or Edge with no login. Do both at least 24 hours before your test.
The technical check does not confirm that your webcam is set up correctly. Run the separate webcam diagnostic below for that.
Open the webcam diagnosticThe test will not open without the secure browser. Do both at least 24 hours before your test.
Logging in and checking your details
Logging in on test day
Get into the test portal through the secure browser. The two ways to open it are set out below. After you log in you accept the terms, check your registration details under Your Details, fill in First language and Reason for taking the test, then press Submit.
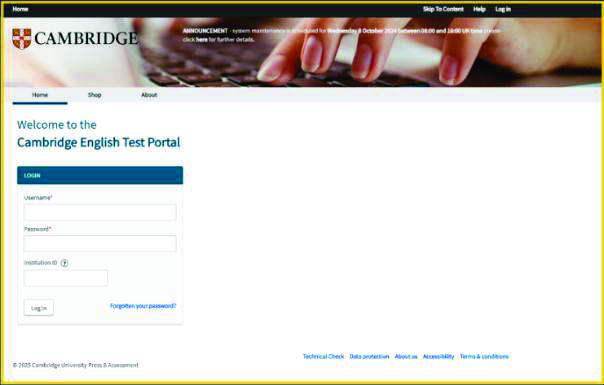
You need all three (Username, Password and Institution ID) to get in. View full size
Opening the test portal
Open the test portal in the secure browserPress this in the Chrome or Edge you normally use and the secure browser starts up and takes you to the login screen. The Institution ID is already filled in as KR066. Note that opening it this way skips the diagnostic, so run that separately beforehand.
You can also open the secure browser first and type the address in.
https://www.metritests.com/metrica/kr066.aspx
Copy and paste does not work inside the secure browser, so it is safer to write the address down in advance.
AI invigilation checks
Identity and test room checks. The test will not open until these are done.
Test day photo
Clicking the test tile starts the pre-test checks. Once you have accepted the terms, allowed access to your camera and microphone, and shared your Entire Screen, it is time for the photo. Face the camera with your head and shoulders in frame.
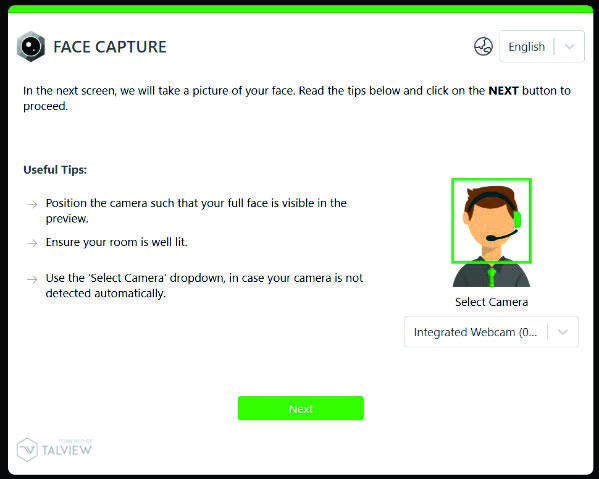
Take your headset off for this. Do not smile or frown, and remove hats and dark glasses. View full size Photo ID capture or upload
Hold the ID you registered with up to the camera, or upload it as a png or jpg file. Covering any of the details with your fingers counts as malpractice.
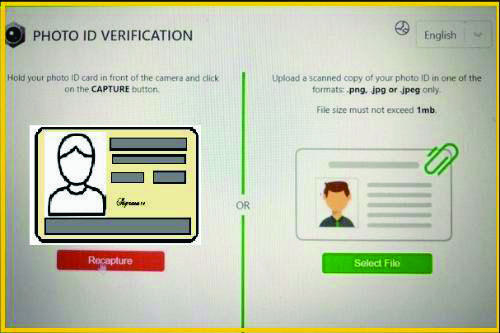
Moving the ID back a little helps the camera focus. If the Capture button turns red you can still continue. View full size 360-degree test room check
Turn your webcam slowly right around so the whole room is visible, including your desk, the floor and the ceiling. If the camera is built in, turn the whole laptop. This check is recorded and reviewed too. Trying to hide any part of the room may be treated as malpractice, and if the check is skipped or not done properly, your result may be disqualified.
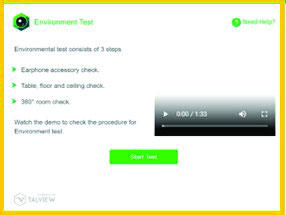
Ignore the message telling you not to use earphone accessories. Use whatever you prepared under the Headset item above. View full size
Not allowed during the test
Everything you do is recorded, and the whole recording is reviewed after the test, so avoid anything that could look suspicious.
Leaving your seat
Once you pick a module and start, you cannot leave your seat, so use the restroom beforehand. If you need a break, take it between modules and keep it under 20 minutes.
Looking away from the screen
Looking away from the screen or scanning the test room can be treated as suspected malpractice.
Covering your mouth
Keep your hand and any object away from your mouth. Your face has to stay visible to the camera.
Speaking aloud
Do not talk or whisper aloud except during the Speaking module.
Food and drink other than water
No smoking, vaping, eating or drinking anything but water in the test room.
Leaving the test window
Do not switch to another window or use another device, and do not use keyboard shortcuts. If you press one by accident, press CTRL to return to the test.
Stopping the screen share
If the screen-sharing message covers a question, tuck it away with Hide. Never click Stop sharing: your screen stops being recorded and you will not receive a result.
Moving out of camera shot
Any stretch with no recording, or where only part of you is visible, is flagged as suspicious and you may not receive a result. Click the video icon to check your head and shoulders are in frame, and adjust the webcam if they are not.
If something goes wrong
Recovery procedure if the test stops
Work down the list in order.
Refresh icon or F5
Returns you to the start of the question you were on
CTRL + F5 (hard refresh)
Resumes from the question you were completing
Shut down the secure browser and Metrica, then reopen and log back in
Your previous answers are stored, and you return to the start of the question you were on
Refreshing means going through the photo, the ID capture and the 360-degree check again, and the 360-degree check must be done as thoroughly as the first time. Tell us at any step if you need help, and remember that every module must be finished within four hours.
If your camera doesn't show
If the camera picture doesn't appear for the photo or the 360-degree check, work through these steps in order.
Allow camera access
When the pre-test checks ask for access to your camera and microphone, click “Allow”. On a Mac, permission problems can occur if the secure browser has not been set up in advance, so follow the setup guide linked from the Cambridge candidate booklet below before test day.
Choose the camera yourself
If the camera is not detected automatically, pick it from the list in the camera step.
Close every other program
Close all programs, browser tabs and background apps, including video-call apps such as Zoom, Teams or Skype. You can see what is running in Task Manager.
Restart the test
If AI invigilation won't start or the camera still doesn't appear, restart the test. The pre-test checks will start again from the beginning.
Pause your security software's real-time scanning
If the camera still doesn't show, briefly turn off real-time scanning in your antivirus or other security software and in Windows Security (Real-time protection), then reopen the secure browser. Turn it back on as soon as the test is over.
If none of this works, contact us. Running the webcam diagnostic under “Getting set up” before test day helps you avoid this on the day.
If the microphone or sound doesn't work
If you can't hear any sound, or your voice isn't recorded in the technical check or the test, work through these steps in order.
Check the headset is plugged in and unmuted
Make sure the headset is connected by USB or cable and that its own mute is off. Bluetooth is not supported.
Leave only the headset switched on
On Windows, right-click the sound icon on the taskbar, open the sound settings and go to the Sound Control Panel. On the Playback and Recording tabs, disable every device except the headset you will use, such as a laptop's built-in speakers and microphone. You can enable them again in the same window after the test. On a Mac, open Sound in System Settings, slide the input volume of any microphone you won't use all the way down, and set the headset's input volume to maximum.
Check the volume
Turn up both the computer's volume and the volume control on the headset, and keep the microphone volume at least halfway. If there is no sound, the system volume may be too low or the headset muted; try playing a sound on another site. If you can't hear yourself in the technical check, the wrong microphone may be selected in your operating system.
Test a recording in another app
Record your voice with Sound Recorder on Windows or QuickTime on a Mac to check the headset itself works. Keep the microphone neither too close to nor too far from your mouth.
Check sound control apps
If a sound control app, such as one from your headset maker, is installed, its settings can conflict with the browser and stop the headset working. Check its settings or turn it off.
Restart the test or try a spare headset
If it still doesn't work, close the test window and open it again, or restart the test. If that doesn't help, try a spare headset if you have one.
If none of this works, contact us. Check sound and recording in the technical check before test day.
- Loss of internet connection
- Once you are back online, close the test window and reopen it to continue. Repeated or long disconnections can be treated as malpractice, so tell the centre straight away.
- Login email not received
- Cambridge sends your login details from no-reply@metritests.com. It is an overseas sender, so check your spam folder. If it has not arrived 24 hours before your test, tell us.
- Forgotten password
- Press Forgotten your password? on the login screen and enter your Username and Institution ID. Our Institution ID is KR066.
Finishing the test
Your answers are only submitted once you reach the last screen.
Choosing a module and testing
The Timeline screen lists the modules you are entered for, and you can take them in any order. Read the instructions, then press Start at the bottom right.
Finishing with Close
At the end of a module two screens appear asking for feedback. Your test is only submitted once you press the blue Close button. Do not close the browser with the X in the corner.
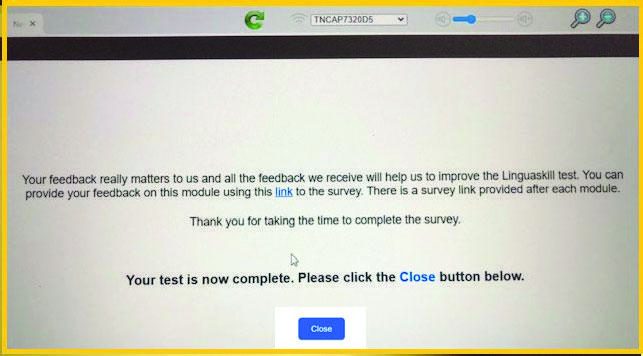
Close takes you back to the Timeline. Check that the finished module now has a green tick. View full size
Your results
- When results are released
- Results are normally available 6–8 days after the test. If the recording review flags anything, that can add up to 10 days on top. You will get an email from no-reply@metritests.com when they are ready.
- Checking results in the portal
- Log in to the Cambridge English Test Portal with the same Username, Password and Institution ID you used for the test, and open the Results tab. You do not need the secure browser to view results.
- Digital certificate
- It shows a Cambridge English Scale score and CEFR level for each module, an average score, and your photo and identity document number. If you are asked to try again in five minutes, the certificate is still being compiled.
- An asterisk (*) on your result
- On Speaking it means the audio was not good enough to assess. On Reading or Listening it means too few questions were answered in the time available. Contact us about re-sitting.
Remarks and appeals
- Enquiry on Results
- Only Speaking and Writing can be remarked. Reading and Listening are adaptive and are not eligible. The centre submits the request on your behalf, so contact us to start it. The deadline is 28 days from the test date and there is a fee. However, if your Speaking or Writing test was 100% auto-marked, Cambridge carries out the enquiry free of charge. A remark can move your score up or down, and if your CEFR level changes the fee is refunded in full. To appeal the outcome of a remark, you must apply within 21 days of being notified.
Contacting us during the test
Problems during the test are handled by us, not by Cambridge. Cambridge support channels are for centres and cannot answer candidates directly. We answer the phone until 5pm, so if you start late you may not be able to reach us towards the end of your test. Follow these steps.
- If the screen has frozen, start with a refresh (F5). It is the first step Cambridge's booklet gives, and it usually clears the problem.
- If that does not clear it, leave the screen as it is, step outside the test room, switch your phone on and call the number below.
- If we need to see your screen, we will talk you through connecting a KakaoTalk video call.
- Once it is sorted, switch the phone off, leave it outside the test room, return to your seat and carry on.
Exam centre +82 2-6958-8991 · Contact +82 10-7507-5330 (support 09:00 to 17:00 KST)
Official sample tests
A sample for each module. They run on the same screens as the real test, so you can see the question types and where the buttons are. No result is produced.
The official Cambridge documents
This page is built from the two documents below, and you can open the originals here.
Contact
The centre can help with test dates, resending your login details, and checking your results.
Written from the official Cambridge documents (Linguaskill Remote Candidate Instructions Booklet V4.0, May 2026, and Linguaskill Terms and Conditions V4.0, April 2026) together with the Cambridge support articles on technical and hardware requirements, the secure browser and the technical check. Screen images are copyright Cambridge University Press & Assessment and Talview.